Configure the Product Review Reminder

This is an article from the Product Review Reminder extension for Magento 1. We've tried our best in the preparation of this help article. If you do not find the answer you were looking for, you can always send us a message through this form.

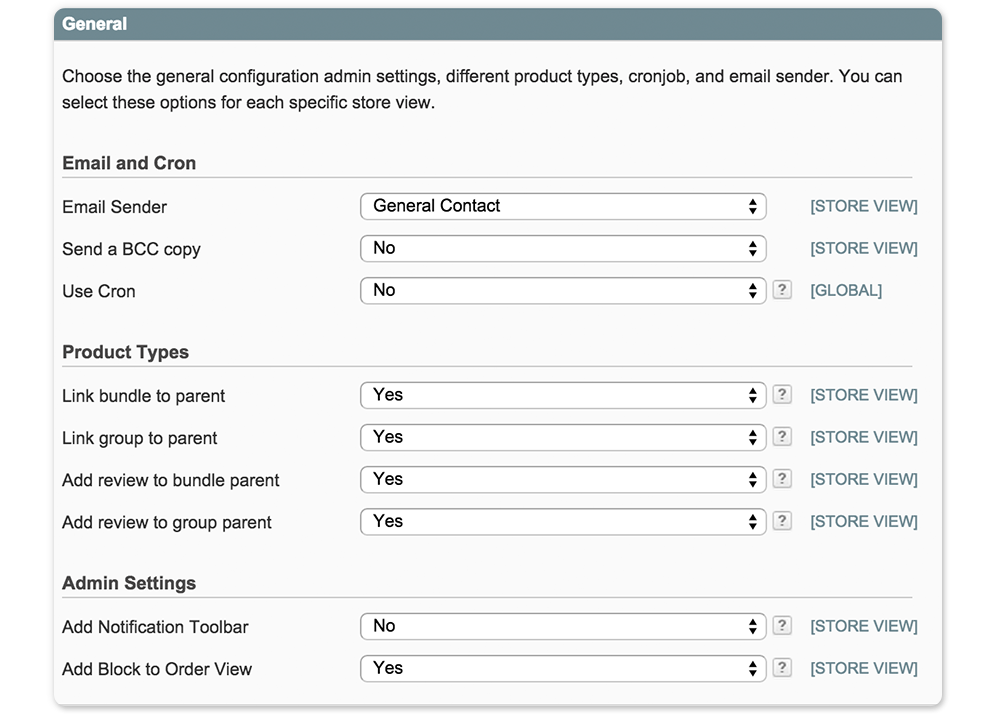
First, you will need to configure general information such as the email and cronjob settings.

Email and Cron: 
Email.
Select the sender of the review reminder. This is configured from your Magento store.

Send a BCC copy.
You can enable BCC copy to send a copy of the review reminder to an extra e-mail address.

Send BCC to.
If enabled, fill in the email address that will receive this copy. 

Use cron.
Select yes to enable the Review Reminder Cronjob and send the emails automatically.

Product Types: 
Link bundle to parent.
Select if you wish to link the product within a bundled product to the parent product.

Link group to parent.
Select if you wish to link the product within a grouped product to the parent product.

Add review to bundle parent.
Select yes to add the review to the parent product of the bundle instead of the simple product.

Add review to group parent.
Select yes to add the review to the parent product of the grouped product instead of the simple product.

Admin Settings: 
Add Notification Toolbar.
Select if you wish to add a small toolbar to your back-end to get a notifaction whenever there is a new product-review open for moderating.

Add Block to Order View. 
Select if you wish to add a product review reminder information block to your order information in the back-end.

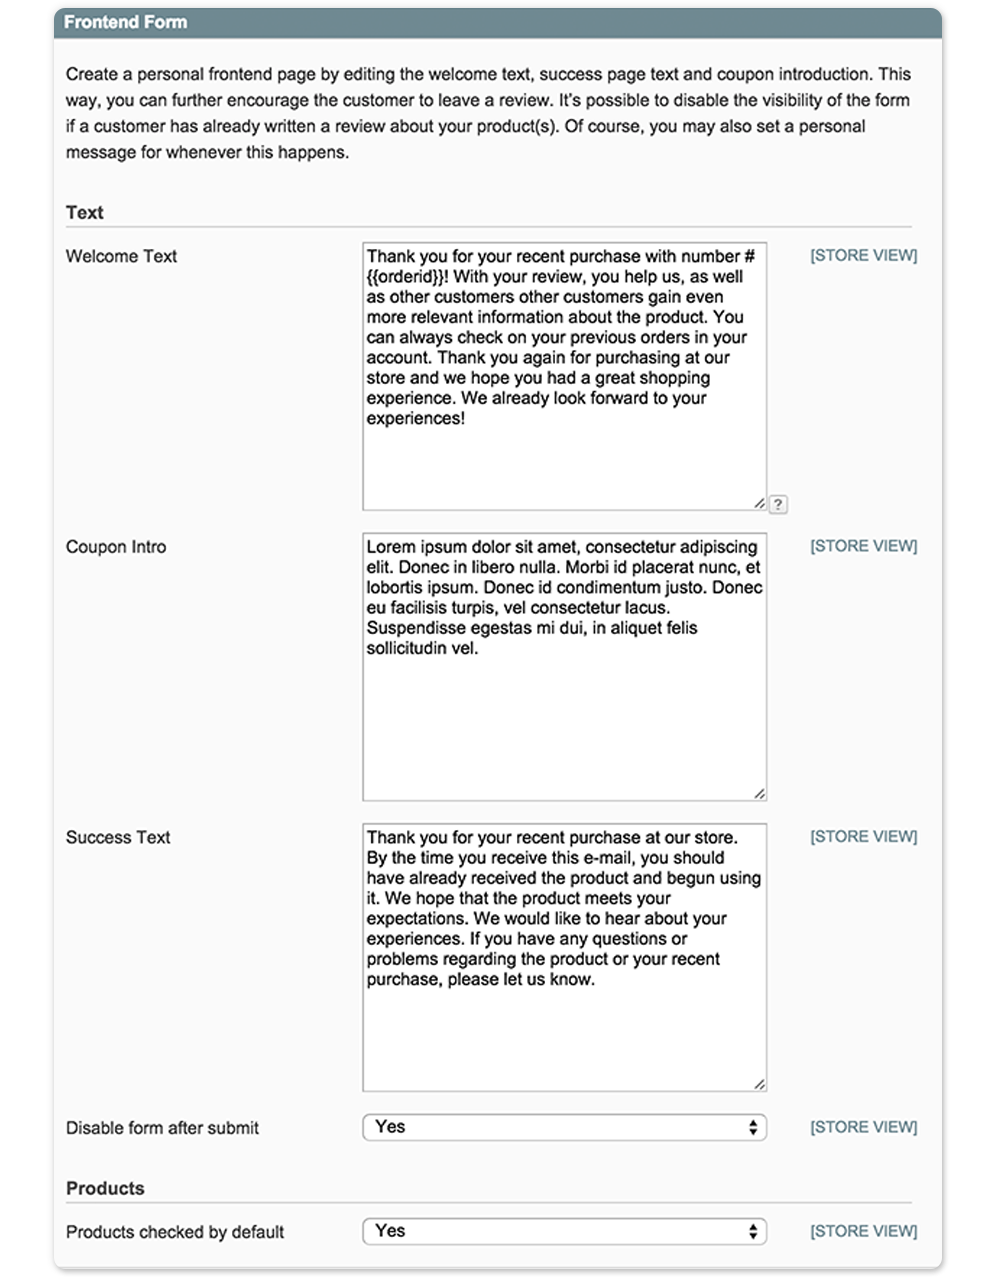
Create a personal frontend page by editing the welcome text, success page text and coupon introduction. This way, you can further encourage the customer to leave a review. It’s possible to disable the visibility of the form if a customer has already written a review about your product(s). Of course, you may also set a personal message for whenever this happens.

Text:
Explain further about product reviews and the way to write it within the welcome text of the page. It will be shown on top of the page as an introduction welcome text. You may also add text for the success page and place anything you want to thank the customer for writing the review.

Disable form after Submit:
Select if you want to disable the form for the customer after they have submitted a complete product review for the certain order.

Products checked by default:
Select if you wish to check all the products by default on the Product Review page.

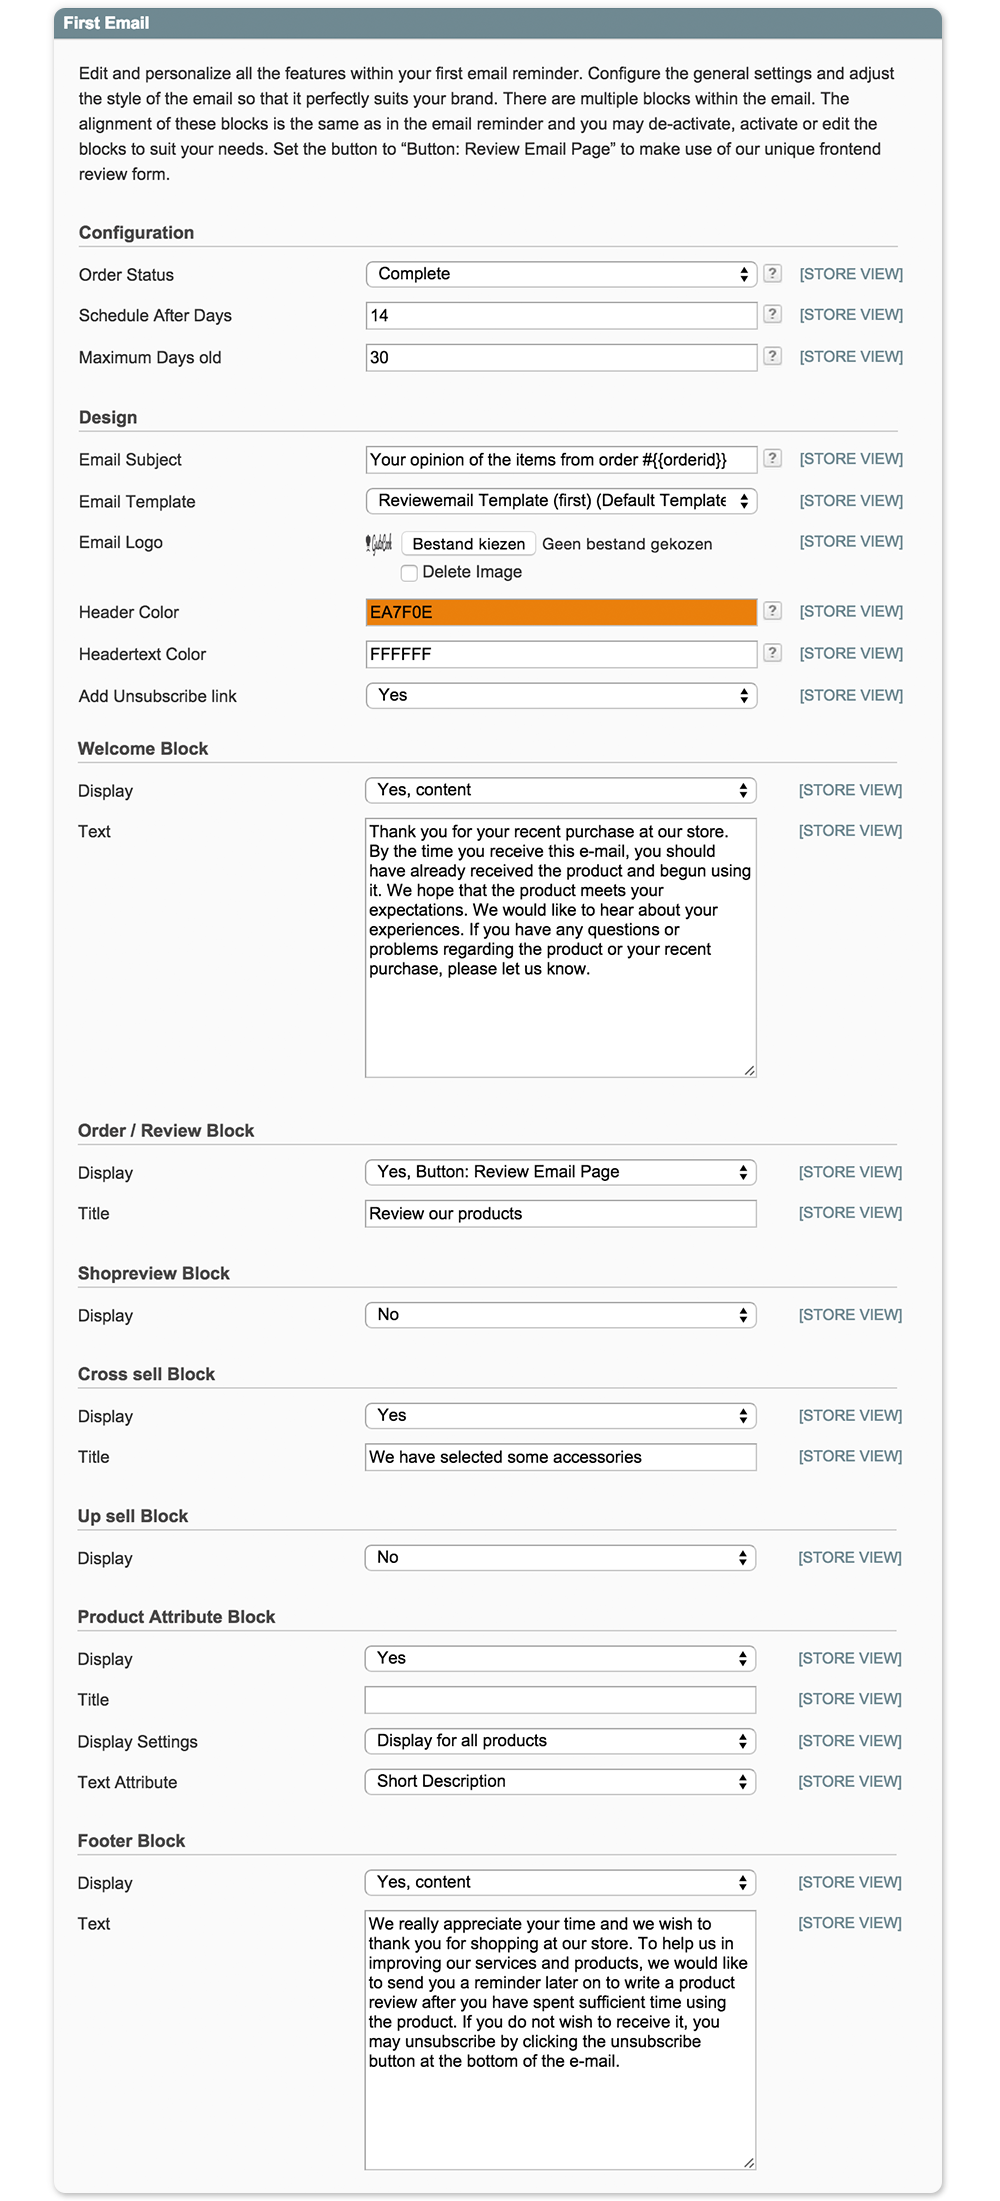
Lastly, select if you wish to add an unsubscribe link in the footer of the e-mail.

Welcome Block:

Display.
No - The welcome block will not be displayed at all.
Yes, static block - Select the static block that needs to be shown within the welcome block.
Yes, content - Fill in the content you want to be shown in the welcome block.

Order / Review Block:

Display.
No: Select this option if you do not want to show a review button at all.

Yes, Button: Review email page: Now the button will link to the extension review page.
Yes, Button: the product review page: Now the button will link to the review of your product.
Yes, Button: the product page: Fill in the link to the section/page/tab of the product review. Use a hashtag or link code that goes behind the original link. Most of the time, it is something like #review and the button will link to your product page.
Yes, Button: A custom link: You may now enter a custom link.
Yes, Only products: If you do not want to link the button to a product, enter your custom link.

Shop review Block:
Enter the text for the shop review if you have a shop review option in your store. If not, you may select no.
No: nothing will be shown
Yes, static block: Select a static block you want to show in the e-mail Yes, content: Fill in the content that you wish to send in the e-mail

Cross sell Block:
Select if you wish to activate the cross sell block in this e-mail.

Up sell Block:
Select if you wish to activate the up sell block in this e-mail.

Footer Block:
Select if you wish to activate the last footer block in this e-mail. No: nothing will be shown
Yes, static block: Select the static block that you wish to show in the e-mail 
Yes, content: Fill in the content that you wish to send in the e-mail.

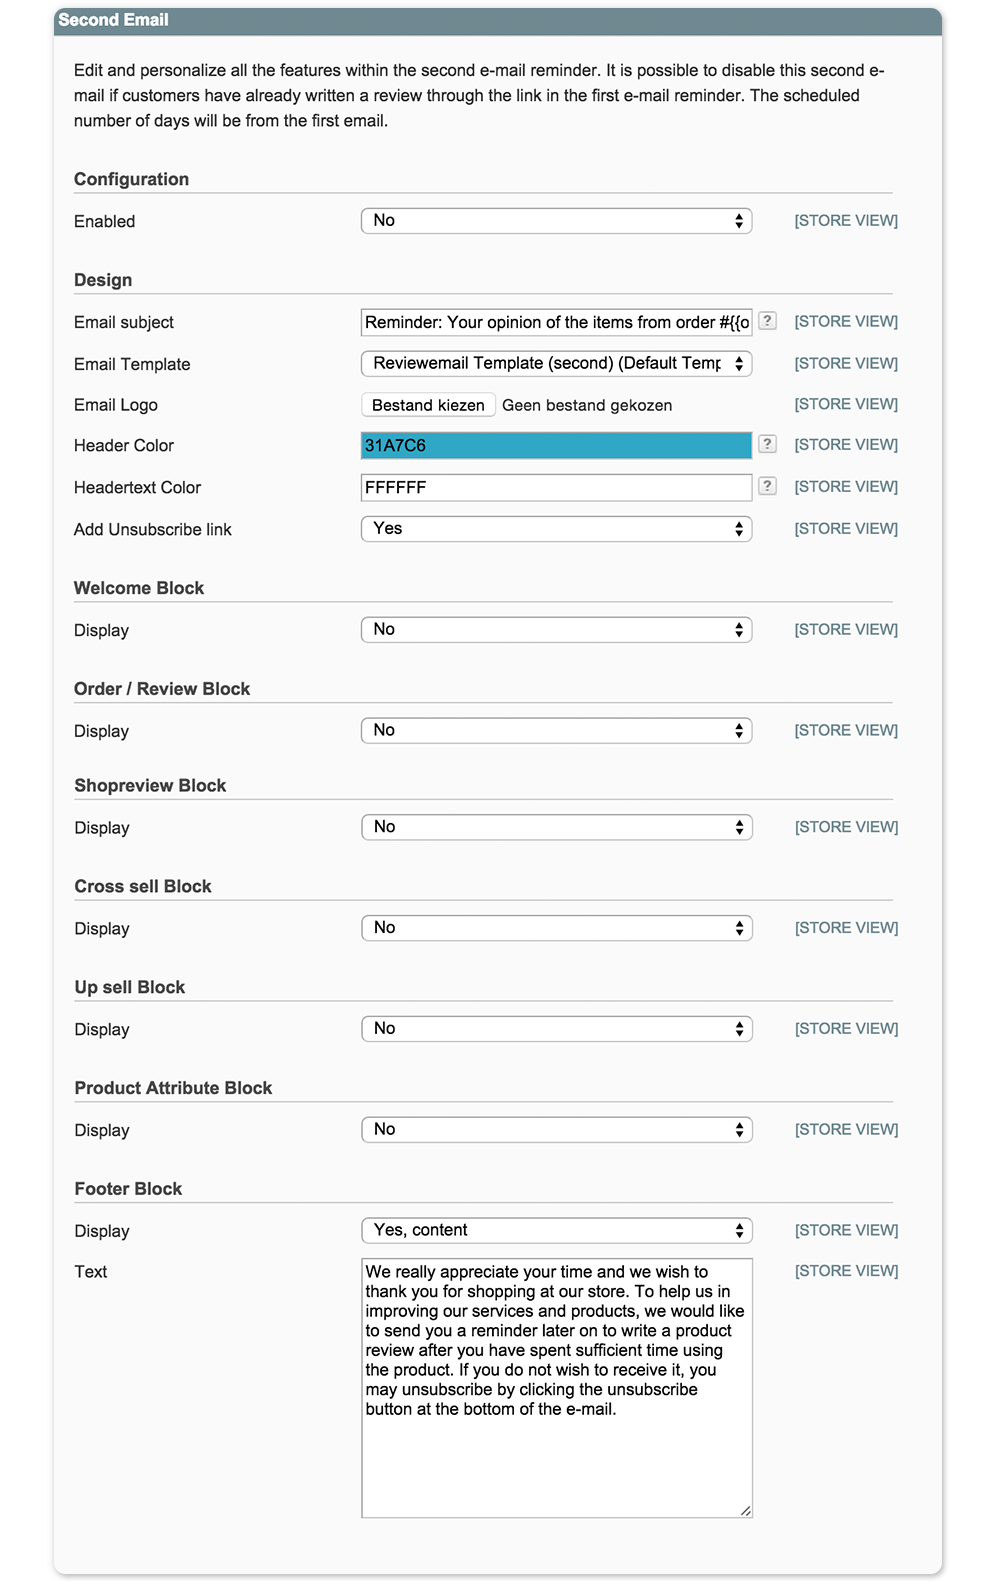
You may use this second e-mail to ask for the product review or simply as a service item.

Settings:

Email subject.
Select the subject of the e-mail that the customers are going to receive. You may use to show the order number in the subject line.

Schedule After Days.
Select the number of days until the review reminder will be sent.

Order Status.
Select the order status from when the email has to be scheduled. 

Maximum Days old. 
Fill in the maximum number of days until the review email will not be scheduled any more.

Design:
You may upload a logo that will be shown in the e-mail layout. If you want a custom email template, you may choose your own transactional e-mail template.
Also select the desired HEX color that will be used in the reminder e-mail and select a HEX color that will be used for the text in the header of the reminder e-mail and change the Email subject..

Lastly, select if you wish to add an unsubscribe link in the footer of the e-mail.

Welcome Block:

Display.
No - The welcome block is not going to be shown at all.
Yes, static block - Select the static block that needs to be shown within the welcome block.
Yes, content - Fill in the content you want to be shown in the welcome block.

Order / Review Block:

Display.
No: Select this option if you do not want to show a review button at all.
Yes, Button: Review email page: Now the button will link to the extension review page.
Yes, Button: the product review page: Now the button will link to the review of your product
Yes, Button: the product page: Fill in the link to the section/page/tab of the product review. Use a hashtag or link code that goes behind the original link. Most of the time, it is something like #review and the button will link to your product page
Yes, Button: A custom link: You may now enter a custom link
Yes, Only products: If you do not want to link the button to a product, enter your custom link.

Shop review Block:

Enter text for the shop review if you have a shop review option in your store. If not, you may select no.
No: nothing will be shown
Yes, static block: Select the static block you wish to show in the e-mail Yes, content: Fill in the content that you want to send in the e-mail

Cross sell Block:

Choose if you wish to activate the cross sell block in this e-mail.

Up sell Block:

Choose if you wish to activate the up sell block in this e-mail.

Footer Block:

Choose if you wish to activate the last footer block in this e-mail. No: nothing will be shown
Yes, static block: Select the static block you wish to show in the e-mail 
Yes, content: Fill in the content that you wish to send in the e-mail.

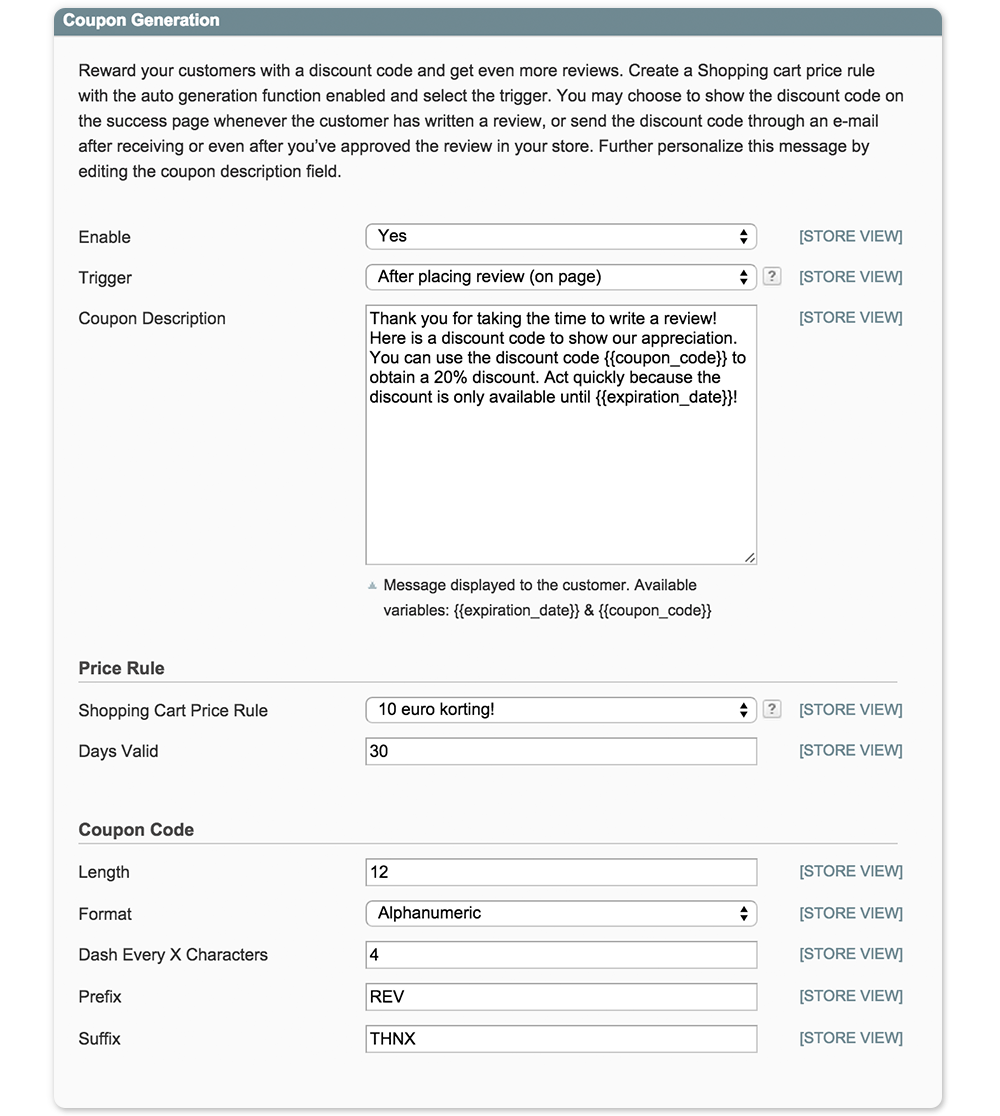
Reward your customers with a discount code and get even more reviews. Create a Shopping cart price rule with the auto generation function enabled and select the trigger. You may choose to show the discount code on the success page whenever the customer has written a review, or send the discount code through an e-mail after receiving or even after you’ve approved the review in your store. Further personalize this message by editing the coupon description field.

Settings:
Enable.
Select if you want to enable the coupon generation functionallity.

Trigger.
Choose when the coupon needs to be generated and send to the customer, you can choose to show it directly on the succes page after submitting a review or send it by e-mail after you've approved the review.
Coupon Description.
Make it personal and show a happy coupon description, you can use the following variables: &

Price Rule:

Shopping Cart Price Rule.
You need to add a unique shopping cart price rule in the magento back-end with the automatic coupon generation activated, after you did this you can select the price rule in this dropdown. 
Days Valid.
Boost the usage of your coupon code and set the number of days that the discount code is valid.

Coupon Code:

Lenght.
Set the lenght of the automatic generated coupon code.

Format.
Set the sort format of the coupon code.

Dash Every X characters.
Add a dash as - after the certain number of characters.

Prefix.
Set a prefix forthe automatic generated coupon code.

Lenght.
Set a suffix of the automatic generated coupon code.

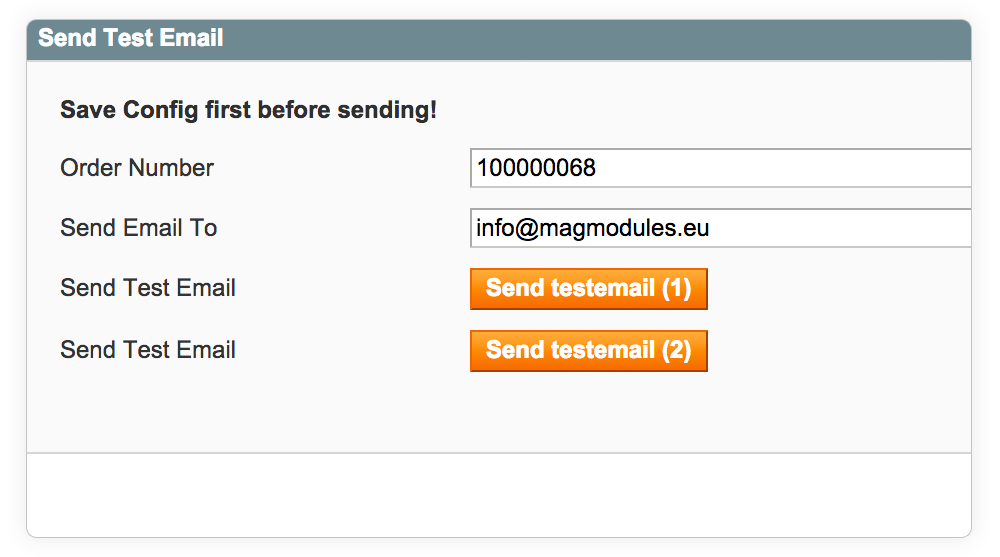
You can easily send a test email to ensure that everything works like you want it by entering the order number from the store view you want to test. You may send the first and second test e-mail to the e-mail you have chosen.

Note: Make sure that you save the configuration after you have entered a valid order number before clicking the test button as the order number needs to be saved first.

You can setup a backlog to queue orders from the past for the review email reminder.

Only use this function when you've setup the configuration and tested the emails.

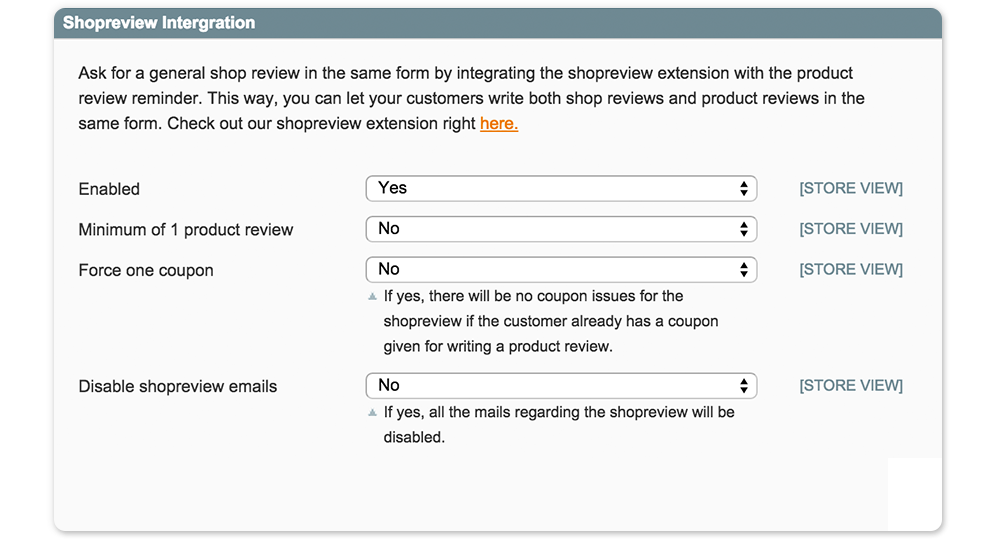
Ask for a general shop review in the same form by integrating the shopreview extension with the product review reminder. This way, you can let your customers write both shop reviews and product reviews in the same form. Check out our shopreview extension right here.

Enabled.
Set if you want to enable the shopreview integration.

Minimum of 1 productreview.
Compulsory your clients to write a minimum of 1 productreview.

Force one coupon.
If yes, there will be no coupon issues for the shopreview if the customer already has a coupon given for writing a product review.

Disable shopreview emails.
If yes, all the mails regarding the shopreview will be disabled.


Direct Help

At Magmodules, our support team is here to help you every step of the way. If you can't find a solution in our Knowledgebase, simply fill in the form below. We are in the Central European Timezone, and all your details are securely sent to us.
The more information you provide, the better we can assist you. Trust us to guide you through any challenge and ensure a seamless experience with our products and services.
Support by e-mail contact@magmodules.eu